How to create a HTC Vive virtual studio with geeks? (under)
Lei Feng: According to author Rui Wang, a veteran practitioner of the VR industry, has written many popular VR articles and is interested in moving to his column . This article is "How to create a HTC Vive virtual studio with geeks? ( Part 1 ), the next article, the article will continue to explain how to create a HTC Vive virtual studio?
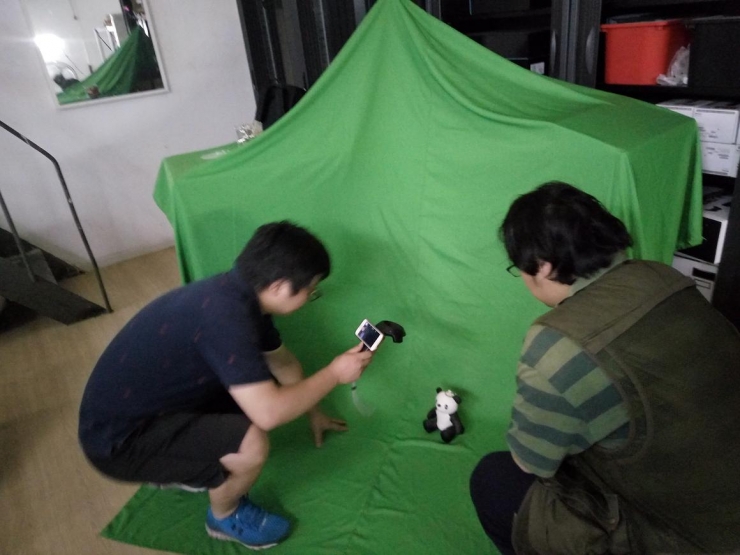
| Building real-time green screen scenesThe environment for buying and setting up keying shots is not a complicated matter. Choose a green (blue) background cloth that is of good quality and is not easy to wrinkle. You should have a good drooping feel when you use a background stand. The extension to the ground may be more troublesome to deal with, because the movement of the actor is difficult to guarantee not to wrinkle the curtain on the ground, especially the beautiful heroine may wear high heels, or need to have an improvisation in the scene. When street dancing. In this case, it is also possible to consider the use of anamorphic glue, which is more suitable for laying directly on a flat surface and stably placing a number of marking points for the positioning of an imaginary grid.

A more professional arrangement would require a studio like a softbox to do the overall three-dimensional lighting, and to avoid as much as possible an apparent projection on the actor, as well as reflective spots due to the bright materials of clothing and props. All these may have an impact on the actual shooting and superposition work in the future.
Of course, the author's working environment is not so ideal, or because of the constraints of site conditions, funding, non-professionalism, and the back of his own silk, the shooting scene that can finally be built for this title is just the following diagram. Yes, even the beautiful actresses couldn't afford it. Instead, they had to use a panda doll to recharge...

However, this does not prevent us from experimenting with the real-time imaging method. In other words, we expect that the video content being shot will be immediately converted to a background with deducted background color (only the left-handed pandas themselves), and then transferred to a simple 3D game-like scene to be superimposed. Presenting a situation in which the actual character is in the virtual world - if you replace the little panda here with a friend wearing a HTC VIVE helmet for a virtual game , and this game scene is precisely the scene he is experiencing, then it is like this article. As stated at the beginning, it is possible to achieve an ideal VR game with a third-person view broadcast effect.
It may not be difficult to output the current shots to PCs used for keying and overlaying. At least we have a number of ways to choose: Mobile shots can be converted to Live Stream video streams via the App, and SLRs and cameras can be directly With video capture card input, Decklink's professional acquisition and conversion equipment can be used even more professionally . Of course, if there is a professional console at hand, there is no need to consider the complicated keying process described later by the author, and the Chroma Keying function of the console can be directly enabled. However, this kind of hardware direct keying implementation program can often be adjusted by many parameters, the operation is complicated, and the price is extremely expensive, not the author's current.
If the captured content does not require real-time transmission, the entire process does not need to be so complicated. For example, we can import video files directly into post-production software such as After Effects or NUKE, and then we can do fine adjustment and output of key parameters directly. However, this obviously does not apply to live broadcasts, so it is not our consideration.
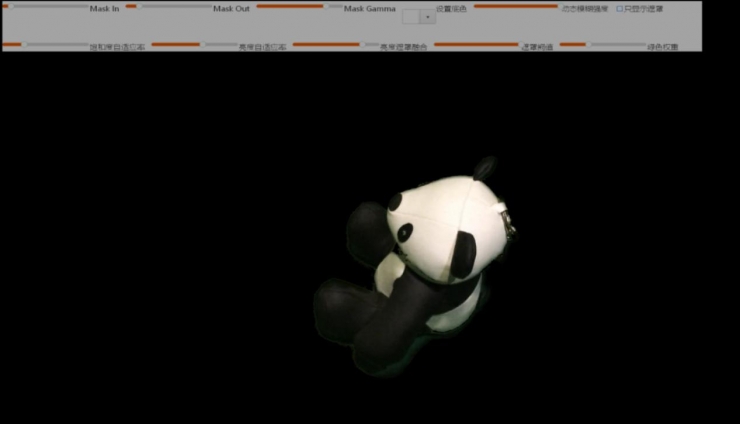
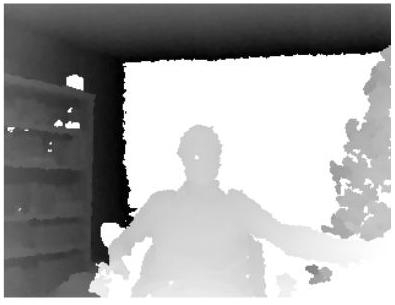
Real-time keying algorithms |An important intermediate product of real-time keying is called Matte. It is usually a black-and-white image in which the black area is completely deducted, while the white area is completely preserved, and the middle (gray) area appears translucent after overlaying.

The above picture shows the results of the Matte chart obtained after the pandas have just been processed. Although due to the influence of the environment itself and the imperfectness of the algorithm, this picture may still have obvious edge defects and it is not satisfactory. But if we overlap it with the picture of the virtual scene , we should already have a correct mix of effects. Of course, this is the next step to consider. The first thing we need to know is how to get such a Matte diagram. There are two common practices in the industry here, one of which is Luma Keying .
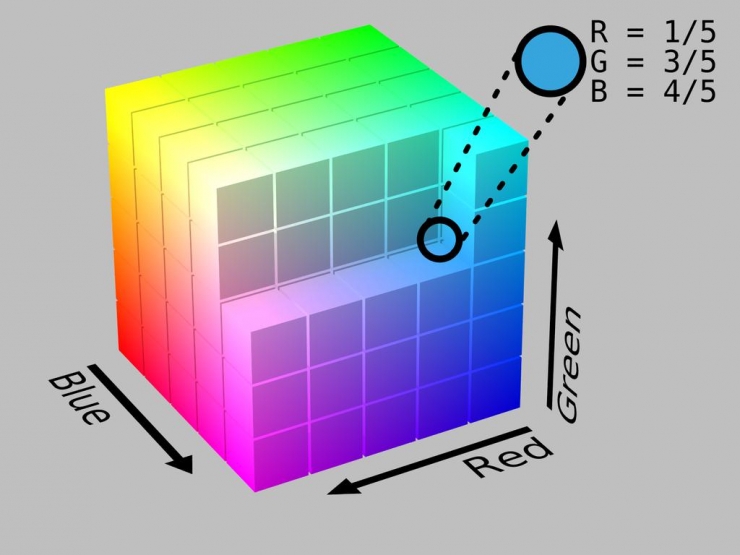
The basic principle of Luma Keying is to differentiate and build Matte by the brightness of the image. For the brightness of an RGB pixel, we can simply express it by the following formula:
Lum = 0.29 R + 0.59 G + 0.12 B
After that we can divide black and white according to a fixed threshold, the color below this threshold is black (color deducted), and the color above this threshold is white. Such a classification method is obviously rude, and a more reasonable scheme is to set a [min, max] interval of a threshold value, a brightness value less than the minimum min outputs black, and a brightness value greater than the maximum max outputs white. The intermediate value outputs the gray value of the 0-1 range. In the actual process, this threshold range is to be adjusted according to the input screen, and this scheme itself is not for the green screen or blue screen scene, but is more suitable for darker background colors and brighter foreground characters, and therefore Not in our plan to adopt.
Another approach is called Chroma Keying . We assume that the RGB color is a three-dimensional coordinate system, then each pixel can be considered as a vector in this coordinate system. Therefore, we can think that two similar colors are closer in the color space - then for the demand of the green screen, it can be converted to "calculate the distance between the RGB pixels and the green pixels. And deducting a color closer to green "is such a more logical requirement. As for how to judge the threshold of this artifact, we can also use the manually adjusted [min, max] interval to complete the output of Matte (black, white, and intermediate colors).
(Via wikipedia.org )
This method is theoretically suitable for any chroma key (ie, green or blue, of course, can be other colors), whether it must be based on the RGB color space, how much to negotiate. Some algorithms choose the HSV color space (Hue-Saturation-Value, Hue-Saturation-Value) to calculate the distance between the current pixel vector and the target vector. This method may be more clear on the intuitive features of the color expression.
The author achieved the above-mentioned Chroma Keying scheme through the GPU programming method, and uses a simple UI interface to do rapid parameter adjustment. Of course, in order to ensure better output and stability, we also need to do some additional functions on the basis of the keying algorithm, such as saturation and contrast adjustment of the output image, and Matte edge blur processing . The basic implementation results are as follows:
Actually, Matte charts can now be directly superimposed on any background video, even if there is no direct connection between their contents. If this background video is precisely the virtual scene we need, and the posture of the virtual camera. The setting has been consistent with the real camera, then we can almost think that this daunting task is nearing completion! Prior to this, the effect of a simple superimposed output was as follows:

Now, our next goal is the sea of ​​stars, oh no, it should be said that it is an implementation of the mixed reality (Mixed Reality) output method .
| Mixed reality, is at handObviously, because of Matte's existence as a mask map, we can already superimpose the actual camera image input from the outside with the virtual scene, deducting the green background and retaining the foreground role. Because of the linkage of gestures between the virtual camera and the actual VIVE handle, we can also ensure the consistency of camera angle of view and attitude. It seems that everything is ready, but there is one problem that still deserves our consideration. That is the mutual obstruction between the scenery.

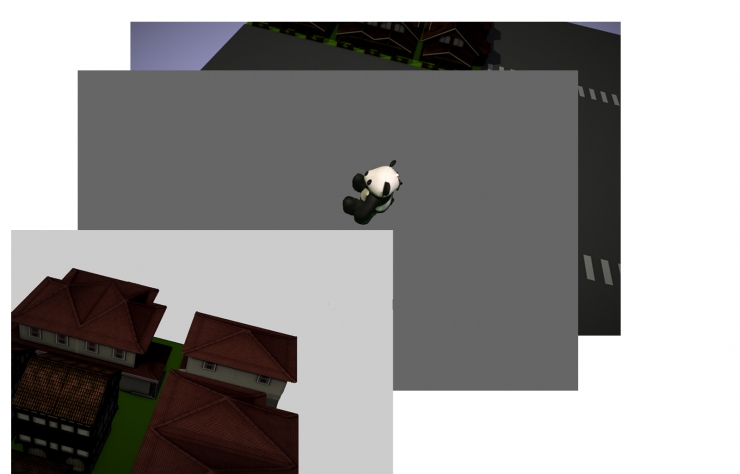
One of the simplest applications is shown in the figure below. Our character is placed in the center of this small street. When there is no occlusion between the virtual camera and the character, it looks like no problem. But once there is a virtual house in the field of vision, blocking the front of the character, things may become tricky.
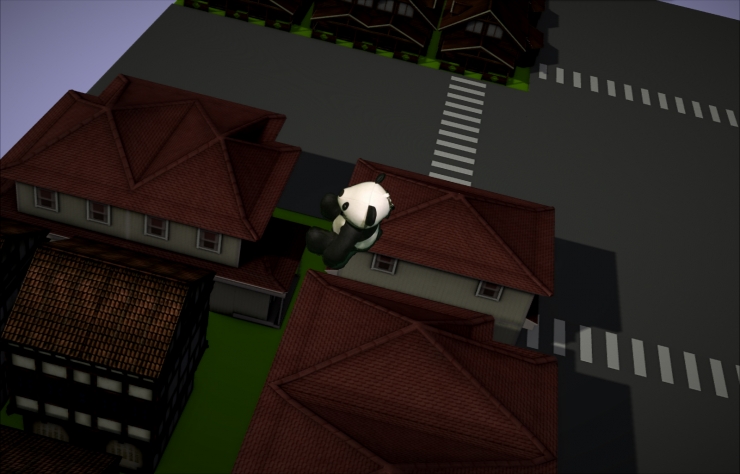
That's right, because we only use Matte masks to superimpose the output of the actual and virtual scenes in 2D. It does not take into account the depth of the virtual scenes. Therefore, the pandas will always be at the top of the screen. It is as if it is stuck to the viewer's eyeglasses, not really in the same scene as the street houses.
This is certainly not the result we want, but it is not an easy task to implement a universal solution to this problem. Because we can't get the depth information of the actual camera shooting picture, we can't predict the depth relationship between it and the virtual scene . If you use an imaging device with depth information, such as a binocular stereo camera, or an RGBD camera like Kinect, the former problem is expensive; the latter problem is the coarse resolution and the confidence of depth information at the edge of the object. Very low, thus causing the result of image superposition to produce very unstable flash. If it is to make a general somatosensory game, then this is harmless; if it is to output the video images of the virtual studio, then this picture quality is obviously unacceptable.
(Via codeproject.com )
It sounds frustrating, but in the actual project, we always have a simpler way to solve the problem.
The most straightforward and effective approach is to provide hints on the position of a live-action character during live broadcast. For example, place a small output screen monitor where he can see, and try to avoid all influence on the occlusion relationship. Virtual objects.
Of course, sometimes we just want some objects in the virtual scene to cover real people such as vases, pillars, fictional creatures, or special effects. At this time, we need to manually set these virtual objects as "foreground" objects, that is, their rendering will always precede the real characters. Other virtual scenes, such as ground and distant buildings, are always on the "background." This constitutes a foreground-middle-background background hierarchy, as shown in the figure:
Of course, with the movement of the real camera and the virtual camera, the virtual object originally in the foreground may change behind the protagonist and become a background; an object that was originally a background may also be turned in front of the protagonist, blocking him behind. If there is such a complex demand, then it is necessary to manually switch the "foreground/background" tag of each virtual object during the live broadcast, and the switching action must be timely and accurate so as to avoid puncturing. Of course, the three depth levels of the so-called "foreground-middle-background" can be further expanded, resulting in more levels and more complicated occlusion relations. However, the staff responsible for such switchover is estimated to be the rhythm of the mother.
Is there any way to automatically switch the virtual object occlusion level?
The answer is yes. If we can know the detailed XYZ position of the real character in the virtual scene, we can also know its corresponding position in the virtual scene, and then know the depth level of our character's role in the rendering output. Automatically calculates the occlusion relationship between the virtual object and the character. For traditional virtual studio applications, possible methods include: arranging an infrared camera matrix over the head array, identifying the infrared radiation source on the protagonist's body and judging his position in space; or using the same color keys in a green screen environment, However, different tapes of different shades are used to paste grids of different sizes, and then the position relationship between the character and the grid is judged to complete tracking and depth recognition.
However, for HTC VIVE users, this has become a natural boon. Because the VIVE helmet can record its position and posture in space, the problem of occlusion between the player and the scene can be easily solved.
However, for more complex overlay requirements, the current technology is often powerless - for example, multiple characters perform complex interactions in virtual scenes, or allow real characters to accurately fall into the virtual Simmons bed, or embrace A virtual ragdoll—a complicated hierarchical relationship at this time, or even an accurate independent in-depth information tracking, cannot solve such problems properly. If this is a well-made large-scale commercial movie, then the post-production staff will have to work overtime to work overtime and frame-by-frame, and cry to complete the task; if this is a real-time live broadcast demand, then stay awake and seek truth from facts...

Fortunately, neither the actual studio setup based on HTC VIVE nor the simple examples in this article require us to consider the above complexities. Now that we have solved so many problems, let us show off and rest and rest.

Lei Fengwang Note: The author Wang Rui, Lei Feng network (search "Lei Feng network" public number concern) exclusive draft article, reproduced, please contact the authorization, not to delete the content.
Related VR courses are recommended:
1. How to create a HTC Vive virtual studio with a geek fan? (on)
2. How to use geeks to make a VR helmet? Not the kind of mobile phone
3. What technologies do you need to learn to develop a product like Hololens?
These are other assessories. They have the function of the respective. They are indispensable. I will introduce their respective function later,please wait a moment. These assessories are very useful,you can't use the Vacuum Cleaner without them. These accessories will let your house more clean and give you a better living environment. Then babies will grow more healthy. So please choose them with vacuum cleaners. Your satisfaction is our motivation.,hope you like it. Now let's see some pictures of these accessories blow.


Extension Tube, Hose Assembly, Telescopic Tube, Insert Tubes
Ningbo ChinaClean Household Appliances Manufacture Co., Ltd. , https://www.chinaclean-elec.com